Friday, December 17, 2010

December 16th - Simple Machines

I was having so much fun teaching this topic that I forgot I had my camera and didn't take a single photo! :) We will be continuing this topic after the Winter Break so I'll try to remember to take some photos during that class session.

We started class with a quick introduction to the six simple machines: lever, inclined plane, wedge, screw, wheel-and-axle, and pulley. We talked about how all machines make life/work easier and that some need a power source to run while others, such as the simple machines, do not.

We completed the lab "Levers" to show just how one of the simple machines can help make things easier.
For this lab, the students were given a stack of four hardcover textbooks and were asked to try to lift the stack of books with their pinky finger. As you might imagine, they had a tough time with this! They were then given two pencils and instructed how to make a basic lever by placing one pencil on top of the other (in a + shape). The students then placed the pencils so the point of the top one was under the stack of books. They pressed down on the eraser end of the top pencil and saw how this lever was now able to lift the stack.

Levers - Rigid bars that pivot on a fulcrum (fixed point). In that first lab, the bottom pencil served as the fulcrum.

Levers are classified as either first-class, second-class, or third-class. Each class has a different fulcrum and load position. We spent some time discussing each lever and completed a short experiment for each one.

First-Class Levers - In a first-class lever, the fulcrum is located between the effort force and the load. To lift a load, a downward force must be applied to the opposite end of the lever. A seesaw is a good example of a first-class lever.
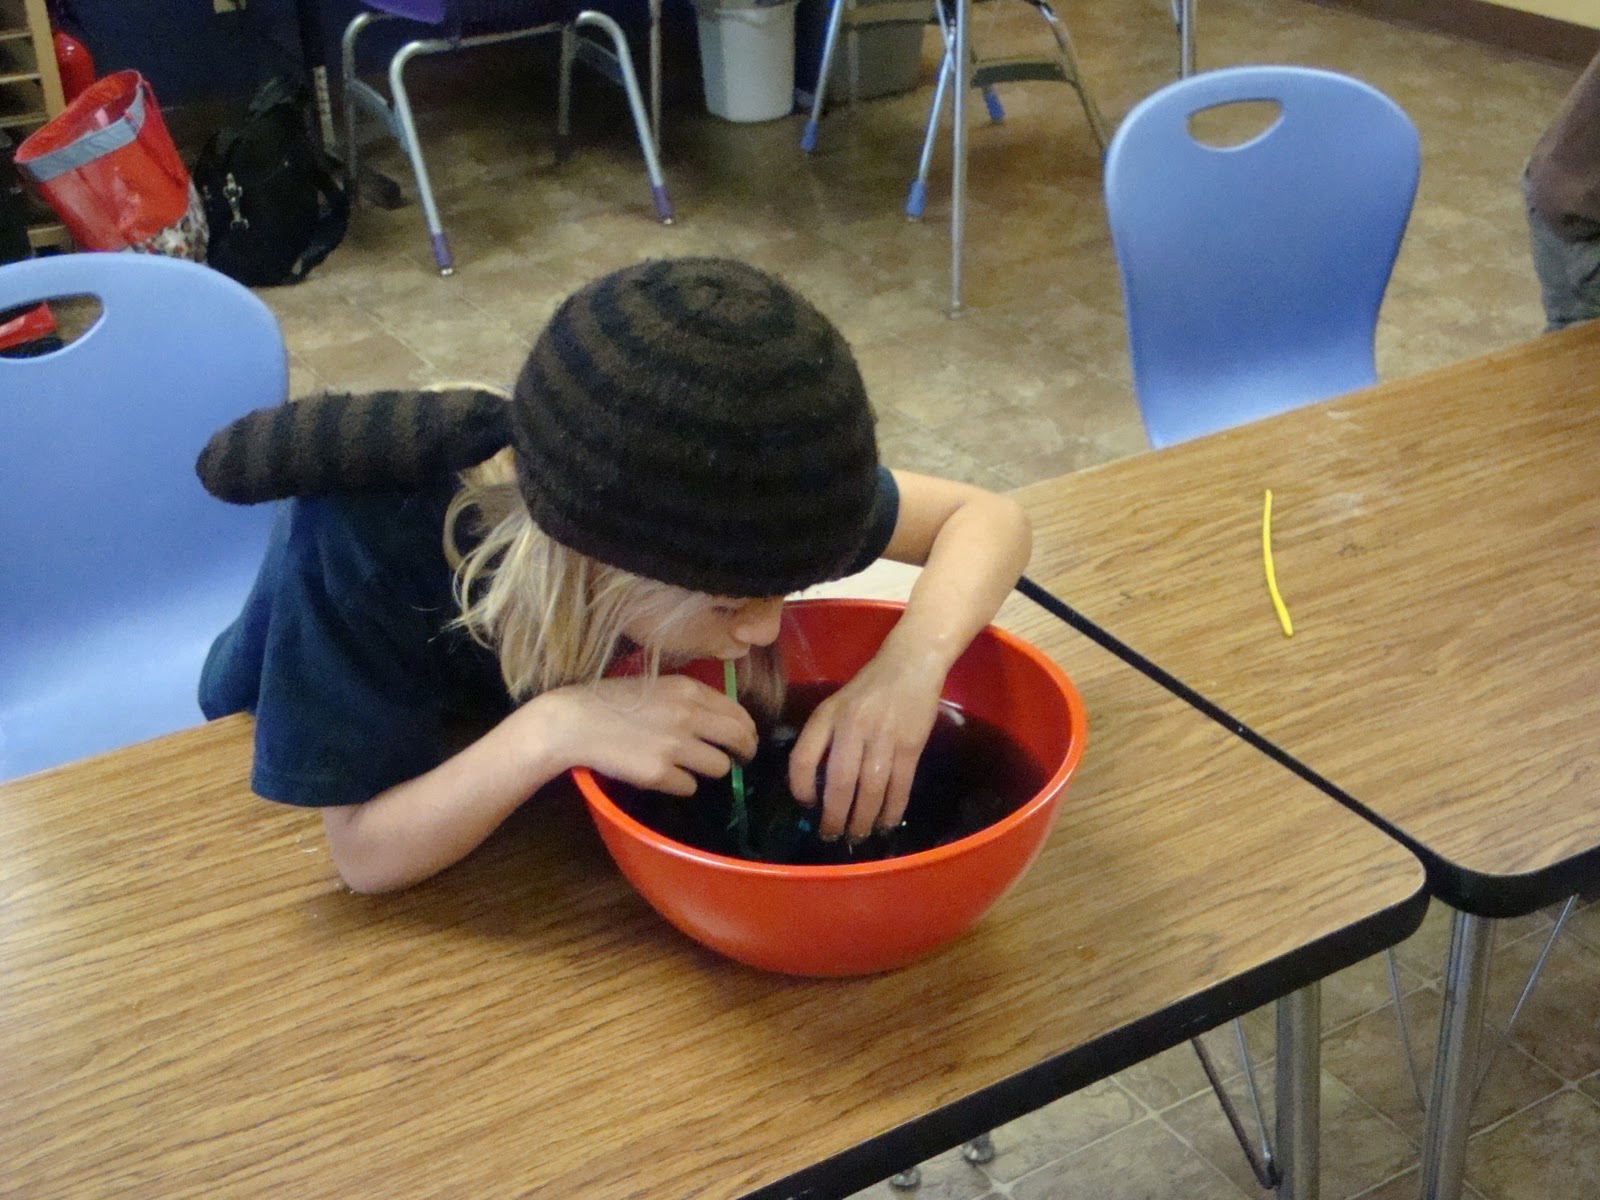
For this lab, the students were given a small cardboard crate, some marbles, a lever, a fulcrum, and a spring scale. We started out by placing the fulcrum far away from the load position (almost at the opposite end of the lever). The students then placed the crate of marbles (our load) on the end of the lever that was away from the fulcrum and the spring scale on the end near the fulcrum. The students then pulled down on the spring scale until the load began to move. They noted how much force (in ounces) was required to lift the load.
The students then repeated this lab after moving the fulcrum so it was located under the center of the lever. They noticed it took less effort to lift the load when the lever was in this position.

Second-Class Levers - These differ from First-Class Levers in the sense that the load is placed between the fulcrum and effort force. If you think of a wheelbarrow, the person pushing the machine (the effort force) is at one end, the load is in the middle, and the fulcrum is located near the front wheel.
For this lab, we taped the fulcrum to the edge of a desk then set up the lever by placing the fulcrum at one end of the lever bar. Our lever was hanging off the end of the table. We tied a string around the end that was hanging off and hung the marbles (in a drawstring bag) on the lever about 2 inches from the fulcrum. The spring scale was hooked onto the piece of string and the students pulled up on the spring, noting how much force was needed (in ounces) to lift the lever. We tried this again with the load (bag of marbles) 5 inches from the fulcrum and 8 inches from the fulcrum.

Third-Class Levers - In a third-class lever, the effort force is located between the load and the fulcrum. A fishing rod, with the effort force (reel) between the fulcrum (handle) and load (hook) is an example of a third-class lever. Tweezers are another example.
To demonstrate how third-class levers operate, the students taped the fulcrum to the underside of a desk (at the edge) with the point facing down. One student held the lever bar so one end was at the fulcrum. We tied a piece of string to the lever about 2 inches from the fulcrum and added the drawstring bag of marbles to the opposite end of the lever. The spring scale was then attached to the string. The students pulled on the scale and recorded the force needed to lift the load. We then repeated this with the scale placed at a distance of 5 inches from the fulcrum and again at 8 inches from the fulcrum.

Inclined Plane - An inclined plane is a smooth, flat surface tilted at an angle like a ramp. Instead of lifting a load straight up, an inclined plane allows a load to be moved over a longer distance to reach the same height. This requires less effort.

Inclined Plane lab - We used the lever bar from the previous labs to create our inclined plane or ramp for this experiment. The students used books to create an incline, starting with one book. The cardboard crate was filled with 40 coins to create a load. The students placed the load at the bottom of the ramp and used a piece of string to attach the spring scale to the load. They then pulled on the scale and measured the effort needed to pull the load to the top of the ramp. We repeated this lab using 2 and 3 books to create steeper inclines.

Wedge - A wedge is two inclined planes back-to-back. Wedges work by changing the direction and amount of force. Some examples of wedges include an ax, nails, a knife, and teeth!

Wedge lab - For this lab, the students used different materials to attempt to lift a crate of marbles. The students used the eraser end of a pencil, the point of a pencil, a crayon, and the pointy end of a pair of scissors to attempt to lift the crate of marbles. The students discussed which ones made the job easier. The pencil point and the scissors were found to be the best wedges.

Screw - A screw is an inclined plane wrapped around a cone or column.

"Lifter" lab - Each student was given a large wood screw. They placed two fingernails on the first ridge at the tip of the screw and then turned the head of the screw to observe its movement.
Screws are used to connect things but they can also be used to lift items. Screw jacks, for example, can lift houses or cars.

We had just enough time at the end of class to go back and complete some more labs on the simple machines we covered today.
"Ramp" lab - This lab showed how a winding mountain road is an inclined plane.
The students were each given a pencil, a ruler, a piece of paper, and some tape. They cut a 5-inch square from the piece of paper then drew a diagonal line across the square. The students cut across the line and colored the longest edge of one of the paper triangles. They then taped the triangle to the pencil so the shortest leg of their triangle was taped vertically to the pencil. The students then wound the paper onto the pencil and saw the colored line make a shape like a winding road or screw around the pencil.
As we discussed, inclined planes make work easier by gradually traveling upward over a long distance. A winding mountain road is a longer way up a mountain but it is easier than traveling straight up a side of a mountain.

"Weakling" lab - This lab demonstrated a second-class lever.
Each student was given a toothpick. They placed the toothpick across the back of their middle finger at the tip of their fingers and under the first and third fingers. The students then tried to break the toothpick by pressing down with the first and third fingers. We tried this again by moving the toothpick down to the first knuckle of the middle finger.
In this lab, the fingers were acting as a second-class lever similar to a nut-cracker. The fulcrum in this lever is where the fingers join the hand so more force is needed to break the toothpick when it if placed farther from the fulcrum.

The labs "Levers," "Ramp," "Lifter," and "Weakling" are from Physics for Every Kid.
VanCleave, J. (1991). Physics for Every Kid: 101 Easy Experiments in Motion, Heat, Light, Machines, and Sound. San Francisco: Jossey-Bass.

The labs "First-Class Lever," "Second-Class Lever," "Inclined Plane," and "Wedge" are from a Lakeshore Learning Science Activity Tub on Simple Machines.

**We will take two weeks off for Winter Break so there will be no class on December 23rd or 30th. Our last class for the Fall semester will be held on Thursday, January 6th. During that class we will finish up simple machines and see how simple machines can be combined to create compound machines.
Learning Center classes for the Spring 2011 semester will most likely begin during the week of February 21st. Check your e-mail in the new year for information about class offerings.

Thursday, December 9, 2010

December 9 - Heat and Temperature (continued)

We continued our study of heat this week by learning more about the transfer of thermal energy. We also studied endothermic and exothermic reactions and conductivity of heat.

To begin class, I asked the students to name some sources of heat. These can include the sun, geothermal heat, and fuels such as wood, charcoal, coal, oil, gasoline, and natural gas. One of the first answers given by a student was friction which was a great segue into my next question: "Can friction be a source of heat?" :)

I asked the students what would happen if they pressed their hand against a cool tile wall or the cool metal cabinet in our classroom. They knew the cold object would make their hands cold. I told them that if they then moved their hand away and touched the same spot with their other hand, that the wall or cabinet would actually feel a little warmer. I then explained this happens due to the flow of heat from the students' warm hands to the cool wall or cabinet.

We then discussed how two drinks that were originally at very different temperatures could reach the same temperature over time. I asked the students to imagine they were working in a restaurant. Two customers had just left and you are cleaning up the table. One of the customers had a hot chocolate and the other had an ice-cold soda. When you picked up the drink containers, though, you noticed they are now the same temperature. How did this happen? The students realized the heat from the hot chocolate had transferred out to the cooler air while the warm air had transferred into the icy soda. Heat generally flows from a warm object to a cooler object.

Here's a fun lab to try at home (with minimal materials!)
"Heat - Energy Extraordinaire!"
Mix a dish soap and water solution in a cup (use 1/2 tsp. of liquid dish soap and 1 tbsp. of hot tap water).
Add hot water to a second cup so it's about half-full.
Lower the mouth of a plastic bottle into the detergent solution so you have a nice film that covers the mouth of the bottle (think of the film you want when dipping a bubble wand into bubble solution).
Now, slowly push the bottom of the plastic bottle into the cup of hot water.
Observe.
As we learned, heat energy likes to travel from warmer areas to cooler areas. When you push the plastic bottle into the cup, the heat from the water travels into the bottle. This warms up the air that is in the bottle causing the air molecules to get excited and move faster. This increases the air pressure causing it to create a bubble at the mouth of the bottle. 

We switched gears at this point to learn about conductivity. Conduction is a point-by-point process of heat transfer. What that really means is that if one part of an object (say, the bowl of a metal spoon) is heated by direct conduct (or contact) with a heat source (say, a bowl of hot soup), the neighbouring parts of the object (in this case, the stem of the spoon) will also become heated. Heat travels along or through an object by conduction.
The molecules in any object, as we learned last week, are in constant motion. When one part of an object is heated up, the molecules start moving faster. This causes them to bounce off each other more and transfer heat as they bounce. Eventually, through bouncing and hitting and heating lots of other molecules, the temperature of the entire object increases. Through the process of conduction, all the molecules pass heat around to each other until they are all hot.

"Cold Foot" experiment:
For this lab, we placed a bathroom rug and a piece of aluminum foil on the floor and left them undisturbed for about 10 minutes (while we completed the next lab, "Heat Conductors"). Each student stood with one bare foot on the foil and the other bare foot on the rug. They then compared how their feet felt.
A good conductor of heat (the foil) will allow for the flow of heat. This happens due to those bouncing molecules passing heat around to each other. A poor conductor (also called an insulator) does not allow for this flow of heat. In fact, insulators work to keep the heat from escaping the warm object and transferring to a cooler object.
The aluminum foil felt colder than the carpet because, being a good conductor, it allowed for heat to flow from the students' warm feet. The carpet is a poor conductor so it kept the students' feet warm by trapping their heat in.

"Heat Conductors" experiment:
For this lab, each student was given three spoons: a metal spoon, a ceramic spoon, and a wooden spoon. I asked them which spoons they thought would make good conductors of heat and they gave their predictions. They were also each given a foam cup that was about half-full of very hot water. The students placed the three spoons in the hot water at the same time and let them sit for a few minutes. They then pulled the spoons out one-by-one and felt the temperature differences. The metal spoon was the clear winner/the best conductor. The ceramic spoon came in second since its stem was a little warmer but nowhere near as warm as the stem of the metal spoon. The wood spoon's stem did not heat up at all.
I then gave some examples of conductors and insulators. Metal, of course, is a great conductor of heat. I also pointed out that it is a good conductor of electricity which is why wires are metal. Plastics (such as the foam cup) and ceramics are often used as insulators since they are poor conductors. We talked about the use ceramics in cars (brake pads) and space shuttles to help protect engine parts from heat. I showed the students a pan with a copper bottom and asked why they thought the pan had that on the bottom. We also discussed whether it would be a good idea to stir hot soup on the stove with a metal spoon as well as a better alternative for this job.

To finish up the lesson, I taught the difference between endothermic and exothermic reactions. I wrote the two words on the board along with the words "thermal energy" and asked the class to point out the similarity. We talked about how "therm" relates to heat.
I then circled the prefix "endo" and explained that this means "inner" or "to draw into." We discussed the endoskeleton that humans and all other mammals have in common. I repeated this with the prefix "exo," explaining this one means "outer" or "to give off." We talked about the exoskeleton that ants have.
Endothermic reactions take in or absorb heat while exothermic reactions give off heat. A very simple example of an endothermic reaction is the process of ice changing from a solid to a liquid. In order for an ice cube to melt, it has to take in heat from its surroundings. It melts because thermal energy flows from a warmer object to the cold ice cube.
A basic exothermic reaction would be lighting a match. Striking a match causes the release of heat from the chemical on the match head into the air.

"Heat Changes" lab:
This lab demonstrated an exothermic reaction.
For this lab, I filled a baby food jar with water and then added a teaspoon of powdered bleach. I stirred the mixture and then inserting a thermometer. The students checked the thermometer every few minutes.
Because bleach contains oxygen, adding water to it creates a reaction that gives off oxygen gas. Heat is also a product of this reaction.

Next week: Simple Machines

The lab Heat - Energy Extraordinaire! is available as a PDF from the American Chemical Society (www.acs.org or www.acs.org/kids). A link to the PDF can be found on this website:
http://search.acs.org/search?q=Heat-Energy+Extraordinaire&client=acs_r2&output=xml_no_dtd&proxystylesheet=acs_r2&sort=date%3AD%3AL%3Ad1&entqr=3&oe=UTF-8&ie=UTF-8&ud=1&site=acs&x=0&y=0

The lab Heat Conductors was found on this website:
http://www.kids-science-experiments.com/heatconductors.html

Cold Foot is from Physics for Every Kid.
VanCleave, J. (1991). Physics for Every Kid: 101 Easy Experiments in Motion, Heat, Light, Machines, and Sound. San Francisco: Jossey-Bass.

Heat Changes is from Chemistry for Every Kid.
VanCleave, J. (1989). Chemistry for Every Kid: 101 Easy Experiments That Really Work. San Francisco: Jossey-Bass.

Friday, December 3, 2010

December 2 - Temperature and Heat

We started this week with a review of kinetic and potential energy as well as the law of conservation of energy. I then used a science kit to demonstrate some other energy changes.
Using a D-cell battery, a rubber band, some wire, a motor, and a propeller, I showed how chemical energy in the battery can be changed to electrical energy (through the wires). This then made the propeller spin which was a change to kinetic energy.
After this, I showed how the battery's chemical energy and the electrical energy from the wire could be changed to sound energy by connecting the battery and the wire to a buzzer.
Finally, I showed how chemical energy can be changed to heat (thermal) and light (radiant) energy. All we had to do here was light a candle.

The candle's thermal energy provided a nice segue into today's topic: Temperature and heat. I showed a transparency which had the three states of matter: solid, liquid, and gas, and how the particles in each of these states move. The students learned that solids have particles that are tightly packed together and are unable to move very quickly. Particles in liquids are a little more loosely packed so they can move around a bit more and are also able to move faster than those in solids. Gases have particles that are spaced far apart and move very quickly.
We used this to discuss kinetic energy. While we can't see the particles in a desk or a book move, they are constantly in motion! That desk or book, then, have kinetic energy. The faster those particles move, the more kinetic energy the object has.

Here's how kinetic energy relates to temperature. In science, temperature is the measure of the average kinetic energy of the particles in a sample of matter. Basically, as the particles in an object move faster, their kinetic energy becomes greater and the temperature of the object increases. I asked the students if they thought the particles in a mug of hot tea or those in a glass of iced tea moved faster.
The students were then asked if they thought temperature and heat are the same thing. Heat is the type of energy while temperature is the measure of that energy.

We moved on to complete a few experiments on temperature and heat.
"Hot Band" - This was a very simple lab but it demonstrated the concept. Each student was given a rubber band. They placed the rubber band against their forehead and described the temperature of the band. They then stretched the band and placed it back against their forehead and then told how it felt different. The students noticed that the stretched band felt warmer. When the students stretched the band (using mechanical energy), they caused the particles in the band to move farther apart. This increased the kinetic energy of those particles and allowed it to be transferred to heat or thermal energy.

"Smoke Rings" - This lab showed the downward flow of cold water through warmer water.
We used a bowl, a baby food jar, some food coloring, a piece of aluminum foil, cold water, and warm tap water. I filled the baby food jar with cold water and then added an ice cube to chill it further. The bowl was filled with warm water. We removed the ice cube from the baby food jar and added 7 drops of red food coloring. I then covered the jar with the foil, held it in place with a rubber band, and used a pencil to poke a hole in the foil. We turned the baby food jar over and placed it in the bowl so the top of the jar was just below the surface of the water. The students then took turns tapping the bottom of the jar.
The students observed the cold water from the baby food jar flowing down through the water in the bowl. When we looked really closely, we saw the cold water coming out of the baby food jar in spurts and then dispersing a little (it is supposed to look like rings, hence the name of the lab). The particles or molecules in the cold water are closer together than those in warm water so the cold water weighs slightly more. This makes the cold water sink to the bottom of the bowl of warm water.

"Puff Signals" - This experiment also involved hot and cold water. However, rather than showing cold water moving through warm water, this one showed hot moving through cold.
For this, we used two large-mouthed glass jars. We also needed more red food coloring, a baby food jar, aluminum foil, and 5 ice cubes. We placed the ice cubes in one of the large jars and then filled the jar with cold water. The baby food jar was filled with hot water and 7 drops of food coloring were added. Again, the baby food jar was covered with some foil that was held on with a rubber band. The baby food jar was then placed inside the empty large jar. I removed the ice cubes from the cold water in the other jar and then poured the water into the jar holding the baby food jar. We used a pencil to make a hole in the foil and then used the blunt end of the pencil to tap the foil.
The students saw the hot water puff up out of the baby food jar. As was explained earlier, the hot water is lighter (due to the spacing of its molecules) so it is able to rise to the top of the cold water.

We had a little help from my friends Ben and Jerry for this next experiment. :)
I asked the students what they thought would happen if they placed an ice-cold spoon on top of a scoop of ice cream. I then asked what they thought would happen if a hot spoon was placed on the scoop. What about two hot spoons?
I placed a metal spoon for each student into a baggie of ice to cool it off. One metal spoon for each student was left out at room temperature. A third spoon for each child was heated in steam coming from a kettle. The students tried the room temperature spoon first and noticed little difference (unfortunately our ice cream was already a little melty but they didn't see it melting any more from this spoon). They then tried the ice-cold spoon and discussed what they saw. Last came the hot spoon which, as they had predicted, caused quite a bit of extra melting!
I explained what happened while the students enjoyed their ice cream. The hot spoon caused the ice cream to melt due to a transfer of energy from the spoon to the ice cream. When I placed the spoon in the steam, this caused the particles of the spoon to start moving faster which increased the temperature of the spoon. This energy was then transferred from the hot spoon to the cold ice cream. Two spoons would cause more melting since they have twice as much mass. The more mass an object has at the same temperature, the more thermal energy it has.

We finished up by trying out another lab to demonstrate the transfer of thermal energy. We didn't have much success with this one so feel free to try it out at home!
"Magic Coin" - For this lab each student needed a glass soda bottle and a coin that was larger than the bottle's opening (we used quarters). They also used a bowl of cold water.
The students held the coins and bottle mouths in the cold water for a little while. After removing the objects from the water, they placed the coin on top of the bottle opening. The students then grabbed the bottle neck with both hands and held their hands in place for several seconds. The coin will "jump" (one student actually got it to work).
The warmth from the students' hands caused the air inside the bottle to warm up. As we learned, this caused the particles to move faster and expand. As the air expands, the coin has to move or jump to allow those air particles to move around freely.

Next week: Look forward to continuing our discussion of heat. We'll talk more about the flow of heat (build on what we saw in the ice cream experiment) and we'll also talk about exothermic and endothermic chemical reactions.

The "Magic Coin" lab came from this website:  
http://www.kids-science-experiments.com/magiccoin.html


The lab "Hot Band" is from Physics for Every Kid.
VanCleave, J. (1991). Physics for Every Kid: 101 Easy Experiments in Motion, Heat, Light, Machines, and Sound. San Francisco: Jossey-Bass.

The labs "Smoke Rings" and "Puff Signals" are from Chemistry for Every Kid.
VanCleave, J. (1989). Chemistry for Every Kid: 101 Easy Experiments That Really Work. San Francisco: Jossey-Bass.

November 18th - Kinetic & Potential Energy; The Law of Conservation of Energy

We started out this week discussing different types of energy. I asked the students to name any types of energy they could think of. They did a great job and named almost all the ones I had listed! We also talked about where energy can be found - everywhere.

Energy: The ability to do work or the ability to move something with a force.
We spent some time comparing the two categories of energy: kinetic (working energy) and potential (stored energy). We then moved on to a quick discussion of renewable and non-renewable energy sources.
To provide some examples of kinetic and potential energy, I used the image of a flowerpot sitting on a windowsill. If something, a cat for example, knocked the pot off the windowsill, gravity will cause it to fall toward the ground. As it falls, its potential energy changes to kinetic energy.
We each stretched rubber bands and discussed what type of energy the band will have if we were to let it go. Again, the energy changes from potential to kinetic if you let the rubber band go. The stored energy in the stretched rubber band, or any other stretched or compressed elastic object (a spring or bungee cord, for example), is known as elastic potential energy.
We placed a textbook on the edge of a classroom table and talked about the energy in the book when it is just sitting on the edge and the energy in it if we pushed it off the table. Since gravity will work on the book to push it to the ground, the stored energy in the book is known as gravitational potential energy.

"Loser" Lab - This lab determined the effect mass has on kinetic energy. We attached a string to the handle of a bucket and then taped the other end of the string to a table. A wooden block was placed on the floor in front of the bucket. A student pulled the bucket back and let it swing into the block. We observed how far the block moved. The students then added several large pieces of modeling clay to the bucket and repeated the exercise, again measuring how far the block moved.
Kinetic energy is increased as the mass of a moving object (in this case the bucket) is increased. This allowed the heavier bucket to push the block further than the empty bucket.

"Bump!" Lab - This lab showed the transfer of kinetic energy. Each student was given a textbook and 6 marbles. The students opened the book and placed 5 of their marbles in the book's center groove and pushed them close together. The students then positioned the last marble in the groove about an inch from the other marbles. They gave the marble a push to make it bump the others. The students noticed that the 6th marble stopped once it hit the first marble in the row. They also saw the last marble in the row move away from the group.
This happens due to a transfer of kinetic energy from the marble that was pushed to the first stationary marble which then transferred energy to the next marble, and so on. The last marble eventually receives this kinetic energy and is able to move forward as a result.

"Energy Change" Lab - This lab demonstrated the effect height has on the energy of a moving object. The students were each given a paper cup, a pencil, a ruler (one with a center groove), a pair of scissors, and a marble. The students cut a "door" in the paper cup and then placed the cup over one end of the ruler. They used the pencil to raise the other end of the ruler and then rolled the marble down the ruler. The students observed how far the cup moved after the marble hit it.
The students were then each given a textbook and replaced the pencil with the book. This raised the ruler a little higher. They repeated the experiment and discussed the results.
The students discovered the cup moved farther when the marble started from a higher point. Objects that are higher off the ground (or table, in our case) have higher potential energy than those closer to the ground. As we learned earlier in this lesson, when the object falls or rolls, the potential energy changes to kinetic energy. The height increase also served to increase the kinetic energy, allowing the marble to hit the cup with more force.

At this point in the lesson, we took a break from labs to discuss the law of conservation of energy. This law states that energy cannot be created or destroyed. The students learned today that energy can change; it is just always there in some form.

We completed two labs to demonstrate the law of conservation of energy.
"Bonk!" Lab - The students were given a ruler, a 2-foot piece of string, some tape, a book, and 2 small bouncy balls (equal size). One end of the ruler was placed inside the book. The students then tied the center of the string around the other end of the ruler. They used small pieces of tape to attach the two balls to the two hanging ends of string, making sure they were at the same length. The balls were then pulled away from each other and released.
The students saw the balls continue to hit and bounce off each other until they eventually stop moving. This is another lab showing the change from potential to kinetic energy. After the students used their energy to pull the balls away from each other, the balls had potential energy. When the balls were let go, this energy changed to kinetic energy. The balls will then change their kinetic energy to heat (thermal) and sound energy.

"Shifter" Lab - For this lab, each student used two classroom chairs, some string, and two washers. The students placed the chairs about 1 yard apart and tied a piece of string between them so they had a tight light between the chairs. They then cut two 24-inch pieces of string and tied a washer to the end of each piece. The free ends of these strings were tied to the string between the chairs. One of the strings with an attached washer (String A) was lifted and pulled away so it was level with the top of the chairs. The students then let their String A go and watched it swing back and forth. As this happened, they noticed String B start to move.
Again, this shows the transfer of energy from one object to another. The strings form a pendulum and the energy is constantly transferred back and forth between String A and String B until friction eventually causes them both to stop swinging.

The labs "Bonk!" "Loser," and "Energy Change" are from Physics for Every Kid.
VanCleave, J. (1991). Physics for Every Kid: 101 Easy Experiments in Motion, Heat, Light, Machines, and Sound. San Francisco: Jossey-Bass.

The labs "Bump!" and "Shifter" are from 200 Gooey, Slippery, Slimy, Weird, and Fun Experiments.
VanCleave, J. (1993). 200 Gooey, Slippery, Slimy, Weird, and Fun Experiments. New York: John Wiley and Sons, Inc.

Friday, November 5, 2010

Friction

Friction was our topic this week. We started out class predicting what would happen if the students pushed a textbook across the table. We then talked about what made the book stop. The students knew that friction acted on the book, causing it to slow down and eventually stop. I took this opportunity to review Newton's First Law of Motion (inertia) with the students.

I moved on to ask if the class had ever seen gymnastics on TV. I asked if they had seen the gymnasts rub a white powder on their hands. Ballet dancers will often rub the same powder on the bottom of their shoes before dancing on a smooth floor. I asked the students why they do this. Gymnasts and dancers use rosin to create friction between their skin or shoes and the floor or gym equipment. This creates more grip for them.

Friction is a force that opposes motion between two surfaces that are touching each other. In other words, friction is what happens when two things rub or roll against each other. This could be your two hands rubbing together, skis rubbing on the snow, or a hammer hitting a nail. When two objects are touching, their surfaces tend to stick together like the tiny loops and hooks of Velcro.

Would you expect more friction between an oily floor and a slick leather shoe sole or between a rough sidewalk and the bottom of a tennis shoe?
The amount of friction depends on two factors: The kinds of surfaces and the force pressing the surfaces together.

Sliding Friction: This is what we observed when we pushed the textbook across the table. Sliding friction is caused by two objects touching each other and sliding past one another.

Rolling Friction: This uses wheels. Only the bottom of each wheel is in contact with the ground/road so rolling friction is less than sliding friction. The students each rolled a toy car across the table and observed how quickly it was able to move.

Fluid Friction: When an object comes in contact with a fluid (in the form of a liquid or gas), it is considered fluid friction. Airplanes and race cars are streamlined to reduce fluid friction. They have smooth, curved surfaces to reduce the friction, known as drag, with the air.

We completed three experiments to demonstrate rolling and sliding friction as well as the effect of weight on friction.
1) Roller lab.
For this experiment, the students each had two books. They tied a piece of string around one of the books and then tied a rubber band onto the end of the string. The students placed a second book on top and then moved the books by pulling on the rubber band and measured how far the rubber band stretches.

Each student was then given ten round markers. They used the markers to make "wheels" for the books and tried the experiment again. New measurements were taken and we compared the results.
The rubber band stretched more when the bottom book was placed flat against the table than when it was placed on the pens. This showed that things that roll cause less friction than things that slide.


2) Farther lab.
This lab showed the effect of weight on the energy of a moving object.
The students were given two books, 1 small round jar, and 1 large round jar. They set the books up with the edge of one book on the second book in order to form an incline. The students then placed the small jar at the top of the incline and let it roll down. We used a tape measure to see how far the small jar rolled then repeated the experiment with the larger jar.
The larger, heavier jar rolled farther than the smaller, lighter jar. The friction of the books, air, and floor remains constant during the two experiments. The major difference in this experiment, then, is the weight of the two jars. As the weight of a rolling object increases, its energy increases. This means the heavier jar has more energy and will roll farther than the smaller jar.


3) Wobbler lab.
This lab also involved a jar and books that we used to form an incline. Before we started, I had the students predict if an empty jar or a jar with water would roll farther. They predicted the heavier jar with water would go farther. The students started out letting the empty jar roll down the incline. They then measured how far the jar rolled. I then filled the jar about three-quarters full with water. After securing the lid, the students then let the jar roll down the incline and measured the distance it rolled.
Contrary to what they learned in their last lab, the heavier jar in this experiment did not roll as far. :)
In this lab, the friction of the jar did not remain constant. The water in the jar sloshed around, increasing the friction inside the jar. It takes more energy to move the jar with the water swishing around inside.

We wrapped up our discussion of friction by talking about the advantages and disadvantages of friction and then completed one last friction-related lab.
How Far?
This lab showed how the texture of a surface affects motion.
The students were each given a piece of poster board, a piece of wax paper, and a piece of sand paper. They also each had a bottle of glue, a rubber band, some string, and a paper clip. I had pre-cut the poster board with a small horizontal slit to hold the paper clip and then attached the rubber band to the paper clip. The students looped the string through the rubber band and placed the poster board on the table. They placed the glue bottle at the end of the poster board and then pulled the string just enough to straighten the rubber band.
They then pulled the poster board along three different surfaces (the table, the sand paper, and the wax paper) and measured how far the rubber band moved each time.
The wax paper had the least amount of friction so the rubber band stretched the least when the poster board was placed on this surface. The sand paper had the greatest amount of friction, causing the rubber band to stretch a lot.


Baby carrot submarines.
This was a lab we didn't get to last week so I'd made myself a note to do this one at the beginning of class today. I got all excited about teaching friction that I completely forgot! Luckily, we had a few minutes at the end of class today to complete this buoyancy experiment.
Parents may remember those little plastic submarines that used to come in cereal boxes (I know my siblings and I had quite a few!) This is a really fun experiment to try at home.
Cut a baby carrot in half then use a flat-head screwdriver to make a hole in the cut side of the carrot. Break two toothpicks in half and insert the pieces in the rounded part of the carrot (2 on each end).
Fill the hole in the carrot with baking powder and then place your sub in a bowl of room-temperature water.


 At first, the carrot submarine is more dense than the water. However, when the baking powder and water react, they produce a gas (carbon dioxide) that is less dense than the water. This causes the carrot to rise to the surface. When the bubbles dissipate, the carrot will sink back to the bottom. This will continue until all the baking powder is gone.

Reminder: There will be no class next Thursday, November 11th, in honor of the Veterans Day holiday.

To look forward to on November 18th: Kinetic and Potential Energy; The Law of Conservation of Energy

The labs "Roller," "Farther," "Wobbler," and "How Far?" are from Physics for Every Kid.
VanCleave, J. (1991). Physics for Every Kid: 101 Easy Experiments in Motion, Heat, Light, Machines, and Sound. San Francisco: Jossey-Bass.

I found the baby carrot submarine directions on this website:
http://www.coolscienceclub.tripod.com/baking_powder_submarine.html

Monday, November 1, 2010

October 28th - Buoyancy

We continued our discussion of buoyancy today. We started out reviewing displacement and then seeing how displacement, density, and buoyancy are related.

Density can be described as a way of comparing the "heaviness" of materials. I gave the students an example of a basketball and a rock that weigh the same. The rock is smaller than the basketball but it is heavier. Since the rock has its weight held in a smaller package, the rock is denser than the basketball. 

The first activity today was a demonstration lab - "Mover." For this lab, we had a plastic water bottle that I cut the top off to make a funnel. The bottom of the bottle was filled with cold tap water that we added four ice cubes to. We then filled a measuring cup with warm tap water and added blue food coloring to the warm water. Using the funnel, I poured the warm blue water into the ice cold water while the students observed what happened. We noticed the blue water rise to the top of the bottle.
This happens because cold water is denser than warm water. This is due to the cold water contracting while the warm water expands. A drop of cold water, then, is more dense than a drop of warm water. The dense cold water settled in the bottom of the bottle while the less dense warm water rises. This also explains why the surface of the ocean feels warmer than deeper water in the same section of ocean.

I then dropped a nail in a glass of water and asked the students why, if the small nail sank, can large cruise ships and aircraft carriers float? The students provided some suggestions and we completed the lab, "Floating Boat," to find out.


For the "Floating Boat" lab, the students were each given two 12-inch squares of aluminum foil and 20 paper clips. The students placed 10 paper clips on one of the pieces of foil and scrunched the foil into a tight ball. They then created a square boat with the other piece of foil and placed the remaining 10 paper clips into the foil boat.


The students each placed their boats and foil balls into a bucket of water. The boats floated as they were supposed to. The balls were supposed to sink but ours all floated!


Even though the ball and boat have the same weight, the ball takes up a smaller space making it the denser object. The ball pushes less water out of the way than the boat so there is not (should not be) enough upward force to cause the ball to float.
Large ships are able to float, despite their great weight, because they have hollow compartments that are filled with air. This air increases their buoyancy.

Continuing our discussion of buoyancy and buoyant force, we moved on to discuss differences in salt water and fresh water. I asked the students if there is a difference in the buoyant force of fresh water and salt water. I also asked which one they thought had a greater buoyant force. To test their hypotheses, the students completed a hydrometer lab. For this, we filled a pen cap with modeling clay and then dropped it in a jar of tap (fresh) water. The students then added salt (1 tablespoon at a time) and observed the changes in the pen cap. We found that adding salt caused the pen cap to gradually float to the top of the jar.

The hydrometer lab led into a discussion of the Dead Sea. The Dead Sea is the lowest point on earth. Its elevation is 1,300 feet below sea level! We compared this to the elevation of Vista which is 563 feet above sea level. The Dead Sea is also the saltiest body of water on earth - it is almost 10 times saltier than any of earth's oceans! The minerals in the Dead Sea make the water so dense that people are able to bob on the surface like a piece of cork.

We finished the class session with two last lab projects: "Risers" and "Subs."


For "Risers" the students were each given a clear plastic cup, club soda, and some modeling clay. They divided the modeling clay into five rice-sized pieces and added club soda to the cups. The students immediately dropped the pieces of clay into the cups of soda and watched what happened. The carbon dioxide bubbles in the soda stuck to the clay causing the balls of clay to be light enough to rise to the surface of the cup. Once the clay reaches the top, the bubbles are knocked off and the clay sinks back to the bottom of the cup.


To complete the "Subs" lab, each student was given a plastic cup and a flexible drinking straw. Each student had a turn placing the cup on its side and pushing it beneath the surface of a bowl full of water. They then turned the cup so it sat upside down on the bottom of the bowl. Each student slipped the end of the straw under the rim of the glass and blew through the straw while supporting the glass with one hand (while trying not to restrict the movement of the glass). The students observed that the glass tried to rise to the surface of the water while they were blowing into the straw.


In order for submarines to sink, special tanks on the subs are filled with water. This is similar to the students filling their cups with water. To allow the sub to surface, the water in the tanks is replaced with air. We demonstrated that by blowing into the cups. The air makes the submarines more buoyant, allowing them to float to the surface.

To look forward to next week: Friction!

The labs Floating Boat and Risers are from Physics for Every Kid.
VanCleave, J. (1991). Physics for Every Kid: 101 Easy Experiments in Motion, Heat, Light, Machines, and Sound. San Francisco: Jossey-Bass.

The labs Mover, Hydrometer, and Subs are from 200 Gooey, Slippery, Slimy, Weird, and Fun Experiments.
VanCleave, J. (1993). 200 Gooey, Slippery, Slimy, Weird, and Fun Experiments. New York: John Wiley and Sons, Inc.

Monday, October 25, 2010

October 21 - Center of Gravity, Buoyancy

The students learned about center of gravity this week. We also began an introduction to buoyancy.

I gave the students three kinesthetic tasks to begin the lesson. See if you can do these at home!
1) The Impossible Leap
Bend over and hold your toes with your hands while keeping your knees slightly bent. Now try to jump forward while remaining in that position. Don't unbend your knees or take your hands away from your toes. Can you jump?

2) The Super Glue Chair
Sit in a straight-backed, armless chair with your feet planted flat on the floor and your arms folded across your chest. Now try to stand up while keeping your feet flat and your back straight. Can you do it?

3) Pick Up Trick
Place a pencil (or other object) on the floor about 20 inches from the wall. Stand with your back and heels flat against the wall. Keep your feet together. Try to pick up the object without moving your feet or bending your knees. Can you do it?

These experiments all demonstrate center of gravity. Center of gravity can be described as the point at which the entire weight of a person or object is concentrated or held. In symmetrical objects, the center of gravity is the geometric center of that object. In non-symmetrical objects, such as the human body, the center of gravity changes with every movement we make. In the experiments above, the students' centers of gravity changed each time. Here are explanations of what happened in each task:
The impossible leap. If you were to re-do this but jumped backward you would have no problem. When a person jumps, their center of gravity shifts in the direction they want to jump. To prevent falling over, the person must move their base of support in that same direction. The students were unable to jump forward because they would need to use their toes (base of support) to do so.
The super glue chair. When a person sits down, their center of gravity is at the base of their spine. If you try to stand up while keeping your back straight, your center of gravity is unable to move to a position above your feet (where you need support to stand).
Pick up trick. When standing straight against the wall a person's center of gravity is over their feet. Normally, when a person bends over, their center of gravity moves forward. In order to maintain their balance in this trick, the students would have had to move their feet. Since they weren't able to do this, they weren't able to pick up the pencils.

After discussing the center of gravity movement activities, the students completed a lab ("Shake Up") to show how shape affects speed. They had three objects - a roll of masking tape, a marble, and two jar lids that were taped together. The students predicted which they thought would roll to the end of a tilted table first. The students then let the objects go and observed what happened.


The marble reached the end of the ramp first. This is due to the marble's small size. Because of this, the marble's center of gravity is closest to its overall weight. The slowest object was the roll of tape since it was the largest and its center of gravity is furthest from its overall weight. We decided that this would be more obvious if we had a larger roll of tape. :)

We moved on to begin a lesson on buoyancy that we will continue next week. I placed 1 cup of water into a glass measuring jug and asked the students what they thought would happen to the water level if I added an ice cube. They correctly guessed that the water level would rise. I then asked them how many ice cubes I would need to add to raise the water level by 1/4 cup, 1/2 cup, and 1 cup. The students made predictions for each and we tried each one out.
The raising of the water level when something is added to the water is called displacement. The ice cube displaced or pushed away some of the water causing the level in the jug to rise. We then spoke a little about Archimedes and Archimedes' Principle (displacement and the idea that the weight of the water displaced by an object is equal to the buoyant force in the water).
We also talked a little about buoyant force. Buoyancy is a pushing force while gravity is a pulling force. When we put the ice cube in the jug of water, we noticed that only part of the ice cube stayed above water. This is because gravity is trying to pull the ice cube down to the bottom of the jug while buoyancy is pushing it up to the top of the water/jug. 

The experiments "The Impossible Leap," "The Super Glue Chair," and "Pick Up Trick" are all from this website: http://www.escapadedirect.com/plwigr.html
The "Shake Up" lab is from Physics for Every Kid.
VanCleave, J. (1991). Physics for Every Kid: 101 Easy Experiments in Motion, Heat, Light, Machines, and Sound. San Francisco: Jossey-Bass.

Friday, October 22, 2010

October 14 - Gravity

We began class by discussing what the students already know about gravity. I also asked them how gravity affects human beings.

Each student was then given a sheet of notebook paper and a hardcover textbook. The students were asked to predict what would happen if they dropped the book and paper separately. Would the book or paper fall fastest? We tried this and then predicted what would happen if the paper was placed on top of the book. Again, the students tried the experiment and discussed their observations.

Gravity pulled equally on the book and the paper. So, even though the book hit the ground before the paper when we dropped them separately, gravity's pull on each object was equal. The paper fell at a slower speed due to air resistance. The book's weight overcame the force of the air but the paper, being so much lighter, had little effect on the air's push. This made it fall at a much slower rate.

Gravity is a force that attracts all objects to each other. This attraction is called Gravitational Pull. On Earth, gravity keeps an atmosphere around the planet. It also causes things to fall to the ground, causes the ocean's tides, and causes hot air to rise while cool air falls (which leads to winds).

Gravity pulls things to the center of the Earth. Gravity also gives people and objects weight. Since the force of gravity is different on other planets, people and objects can weigh more or less than they do on Earth on other planets.
Here is a link to a fun website you can use to discover weights of people, pets, or objects on other planets: http://www.exploratorium.edu/ronh/weight/

We completed several other experiments about gravity this week. Here are the details.
*Bigger - In this lab, students made two parachutes each to determine if size affects the speed of a falling parachute.
Each student was given a 12-inch square of plastic (cut from a plastic bag), a 24-inch square of plastic, 8 20-inch pieces of string, 2 washers, and 2 4-inch pieces of string. They used these materials to construct parachutes and then predicted which they thought would hit the ground first (similar to the book and paper experiment from the beginning of the class session). We found that the parachute made from the larger bag fell to the ground more slowly than the smaller parachute. Just like in the book and paper experiment, this is due to air resistance. The larger parachute has a larger surface area and a small weight so it has more air resistance. 

*Gravity Won - The students learned about water's surface tension in a previous lesson. This lab demonstrated the effect of gravity on weak surface tension.
We filled a baby food jar with rubbing alcohol then colored it with food coloring. A straw was placed into the jar of alcohol and held in place with a small piece of modeling clay. When we tipped the jar upside down, the alcohol flowed out of the jar and the straw.
Alcohol has a weaker surface tension than water meaning the attraction between the alcohol molecules is not very strong. The air pressure inside the straw was not enough to hold liquid in the straw so the pull of gravity caused the liquid to flow out of the straw.

*Anti-Gravity - This was very similar to the last lab except we used water instead of rubbing alcohol. Since water has a greater surface tension than alcohol, the air pressure inside the straw pushed up on the water when the jar was tipped upside down while the water molecules pulled from side to side. These pushing and pulling forces were greater than the pull of gravity so the water remained in the straw.

The labs "Same Speed" (book and paper) and "Bigger" are from Physics for Every Kid.
VanCleave, J. (1991). Physics for Every Kid: 101 Easy Experiments in Motion, Heat, Light, Machines, and Sound. San Francisco: Jossey-Bass.

The labs "Gravity Won" and "Anti-Gravity" are from Chemistry for Every Kid.
VanCleave, J. (1989). Chemistry for Every Kid: 101 Easy Experiments That Really Work. San Francisco: Jossey-Bass. 

Thursday, October 7, 2010

October 7 - Motion: Inertia; Newton's Laws of Motion

We continued our study of motion this week by covering inertia (Newton's First Law of Motion) as well as Newton's Second and Third Laws of Motion.

Inertia is the tendency of an object to resist any change in its motion. If an object is at rest, it will remain at rest until it is acted upon by a force. If the object is moving, it will continue to move until acted upon.

We started our session with a lab. This lab was "Crash!" from Janice VanCleave's Physics for Every Kid. Each student had a small piece of modeling clay, 2 rulers, a toy car, a pencil, and 2 books. For the first part of the lab, the students set up a ramp using one book and a ruler. They taped the pencil to their desk about 2 car lengths from the ruler. The students then placed the modeling clay onto the hood of their toy cars and allowed the car to roll down the ruler. The students observed the modeling clay fly off the hood and used the second ruler to measure how far from the car the clay fell. We kept track of the measurements.
After three rolls, the students added a second book to the stack. They made predictions about whether or not the clay would now fly further from the car. Again, they had three rolls and we tracked the measurements.


Once we completed both sets of rolls we discussed how all this related to inertia: when the clay flew off the front of the car, it continued to move even though the car had stopped. As the car rolled down the ruler, its speed increased. The clay was moving at the same speed as the car so, even though the pencil stopped the car, the clay continued to move until gravity acted upon it causing it to fall to the table.

After completing the work with two books, we decided to try it with four.
We moved on to talk about mass and how it relates to inertia. I asked the students if they thought objects with different weights have the same inertia. I used the example of a ping-pong ball, a tennis ball, a basketball, and a bowling ball. The greater an object's mass, the greater its inertia. I also asked them if they would be able to change the velocity of a bowling ball by swatting at it with a ping-pong paddle. We discussed the fact that a greater force would be needed to change the velocity of the bowling ball than would be needed to change that of the ping-pong ball.

The students then completed the lab "More." This lab demonstrated the effect of weight on inertia. The students were given a pair of plastic soda bottles. One bottle was empty; the other was about half full of water. We tied a 12-inch piece of string to a rubber band and then slipped the rubber band onto the bottom of the empty soda bottle. Before we began, I had the students predict which one would have a greater inertia or a greater resistance to motion. The students each pulled on the string to drag the empty bottle across the table. We measured how far the rubber band pulled away from the bottle and recorded our results. We then did the same with the half full bottle. The students discussed that since the bottle with water was heavier than the empty bottle, it had a greater inertia that caused the rubber band to pull away further from this bottle.


We then discussed Newton's Second and Third Laws. I used the example of hitting a baseball versus a bowling ball to describe Newton's Second Law: The Law of Force (Force = Mass x Acceleration). They understood that since the bowling ball has a greater mass, it would require a greater force to hit the bowling ball with a baseball bat.

Newton's Third Law is the law of action and reaction. Whenever an object pushes on another object, the first object gets pushed back in the opposite direction equally hard. We used two labs to demonstrate this concept.
"Balloon Rockets" - Students were given a long piece of string that the threaded a piece of drinking straw onto. They then tied the string to two chairs. Each student then inflated a balloon and taped the balloon onto the straw. The students observed what happened when the balloon was released.
When the balloon was released, it pushed the air out. However, that air pushed back on the balloon (action-reaction), causing the balloon to move forward.


"Paddle Boat" - The students used cardboard to create a simple boat shape. They cut a paddle out of the cardboard and used a rubber band to attach it to the boat. The students then wound up the paddle and placed the boat in a container of water.
When the students wound up the paddle, it turned and hit against the water. The paddle, then, pushed against the water and the water pushed back. This action and reaction caused the boat to move.


We closed up class with one more lab that demonstrated inertia. For this one, I placed five textbooks on the edge of a rolling chair. I pushed the chair across the classroom and then stopped abruptly. Due to inertia, the books remained in motion when the chair stopped. 

To look forward to next week:
We will learn more about Sir Isaac Newton by studying gravity.
We'll find out what some common objects would weight on different planets and we'll complete several experiments about the force of gravity.


The labs "Crash!", "More," "Balloon Rockets," "Plop!" and "Paddle Boat" are from Physics for Every Kid.
VanCleave, J. (1991). Physics for Every Kid: 101 Easy Experiments in Motion, Heat, Light, Machines, and Sound. San Francisco: Jossey-Bass.

Wednesday, October 6, 2010

September 30 - Motion (Pushes and Pulls), Velocity

We're going to start out the semester learning about forces. Our class on September 30th focused on motion.

We discussed how a force can be a push or a pull and then spent a little time talking about examples of pushes and pulls in our daily lives (pushing or pulling a door open or closed, bending over to pick something up, stretching a rubber band, squeezing a tube of toothpaste, etc).

The students completed three hands-on experiments to observe how things can pull on each other. Our first project, "Floating Sticks," involved the students placing two toothpicks side-by-side in a bowl of water. The students dipped a third toothpick into dish washing detergent and then carefully dipped this third stick into the water between the two floating toothpicks. This lab showed how dish washing detergent breaks up the attraction of water molecules. This causes some water molecules to pull on others, taking the toothpicks with them.

Our second project for the day was "Tug of War." For this one, each student was given a sheet of aluminum foil, 1/2 cup of water that was mixed with blue food coloring, and 1/4 cup of rubbing alcohol. The students placed the foil on the table and then poured a thin layer of the blue water onto the foil. They then used an eyedropper to add a drop of rubbing alcohol to the center of the layer of water.
The water molecules on the surface of the water normally pull equally in all directions. However, when we added the rubbing alcohol, the two liquids immediately separate. The alcohol pulls away from the water while the water pulls away from the alcohol.


We also tried a lab called "Powder Dunk." This one didn't have the desired effect so we may re-try this one at some point during the semester. Each student had two soup bowls filled with water. We sprinkled a thin layer of talcum powder over the surface of the water in each bowl. The students dipped one of their toothpicks in shampoo and the other in the dish soap. They then touched the soapy end of each toothpick to the center of the powder in each bowl. We should have seen the shampoo cause the talcum powder to break up into large floating blocks and the dish soap to cause it to rush to the sides of the bowl and then sink.
Since the talcum powder is water resistant, the pieces of talc will float on top of the water. As we know from the last experiment, water molecules normally pull equally in all directions. Soap or shampoo break up the attraction of the molecules causing the water to move outward. The powder should have followed! Since the liquid dish soap will dissolve in water, it should have caused the little pieces of talcum powder to sink since the water will quickly cover the talc.

We moved on to discuss velocity. Velocity describes the speed and direction of an object. We were going to go outside to move around at different speeds and in different directions to demonstrate changes in velocity but the thunder and rain kept us in the classroom. Instead, I used the example of cars traveling on a road to explain this concept. If two objects (cars) are moving at the same speed and in the same direction, we can say they have the same velocity. However, if one car slows down or speeds up, the velocity of that car has changed. We also discussed cars traveling at the same speed in opposite directions (even though the speed is the same, their velocity is different).

After discussing velocity, we spent a little time talking about balanced and unbalanced forces. Forces on an object that are equal in size but opposite in direction are balanced forces. To explain this, I used the example of playing tug-of-war with a dog. When you plant yourself on the ground, the ground actually pushes back up on you. If you do not move backward or forward, the force of the dog pulling must be equal to the force of the ground pushing on you. The forces of the dog and the ground, then, are equal or balanced.
Now, imagine you are playing tug-of-war with the dog but your foot hits a slippery spot on the ground. The ground is now unable to exert as much force back on you but the dog is still able to pull just as much. Since the pull of the dog is now greater than the push of the ground, the forces acting against you are unbalanced. We also tied in velocity. When the forces are balanced and you are not changing either speed or direction, your velocity remains constant. When you hit the slippery patch of ground and the dog is able to pull you over, you accelerate in the direction of the greater force (in this case, the dog). Therefore, your velocity has changed.

There was one more quick lab to close out the class session. This one, "Fly Away," involved the movement of air due to unequal pressure. Each student was given a small glass soda bottle which they laid on its side on the table. They then squeezed a small piece of notebook paper into a small ball. The students placed the wad of paper just inside the opening of the bottle and then crouched down in front of the bottle to try to blow the paper into the bottle. We had mixed results (probably due to the pieces of paper being too big) but we should have observed the paper ball flying out of the bottle. This happens due to changes in air pressure. Before the students blew into the bottles, the amount of air inside and outside of the bottle are the same. When they blew into the bottles, the amount of air inside the bottle increased, thus increasing the air pressure. That extra air has to go somewhere so it exits through the neck of the bottle, pushing the paper ball out with it.

To look forward to next week:
Inertia and Newton's Laws of Motion
We will be making paddle boats and balloon rockets!

The labs "Floating Sticks," "Tug of War," and "Powder Dunk" are all from Janice VanCleave's Chemistry for Every Kid.
VanCleave, J. (1989). Chemistry for Every Kid: 101 Easy Experiments That Really Work. San Francisco: Jossey-Bass.

The lab "Fly Away" is from Physics for Every Kid.
VanCleave, J. (1991). Physics for Every Kid: 101 Easy Experiments in Motion, Heat, Light, Machines, and Sound. San Francisco: Jossey-Bass.

Friday, October 1, 2010

Here's a list of topics we'll cover this semester.

Week 1 (September 23) - Introduction to physical science; the scientific method

Week 2 (September 30) - Motion - balanced and unbalanced forces; velocity

Week 3 (October 7) - Motion - Inertia; Newton's Laws of Motion

Week 4 (October 14) - Gravity

Week 5 (October 21) - Gravity - Archimedes' Principle; center of gravity

Week 6 (October 28) - Buoyancy

Week 7 (November 4) - Friction

*No class November 11 - Veterans' Day Holiday*

Week 8 (November 18) - Kinetic and potential energy; Law of Conservation of Energy

*No class November 25 - Thanksgiving Holiday*

Week 9 (December 2) - Temperature and heat

Week 10 (December 9) - Temperature and heat

Week 11 (December 16) - Simple machines

*No class December 23 or 30 - Winter Break*

Week 12 (January 6) - Simple and compound machines

Friday, September 10, 2010

Welcome!

Welcome!
I created this blog to showcase the work my Learning Center students do during our physical science class. This will be a place for me to post photos of our experiments and projects as well as class notes. Parents can use this space to find out what we've been learning and students can come here to find out more information about the topics we've covered in class.

The first class session will be held on Thursday, September 23rd from 10-11:15 at the Vista Learning Center. During this school year, we'll cover topics from physics and chemistry. We'll be doing lots of hands-on projects and experiments during each of our class sessions and will also work on the scientific method so students will learn how to make predictions, plan experiments, and discuss their findings.
Topics I plan to cover during the Fall 2010 semester include motion, forces, gravity, buoyancy, types of energy, temperature, and simple machines.

I'm excited about teaching this class and know we'll have a great semester!